I could not believe that it has been almost a year since I last blogged here! I have been terribly busy at work with extra new responsibilities and crafting has taken a backseat. I have been crafting though, just a lot less than before.
Lately I have missed crafting a lot. The problem is that I want to do everything! I am really keen to finish my orange coat I started crocheting 2 years ago. I want to knit or crochet a few scarves for winter. I have a load of new fabric I would love to sew something with. And my latest craze - stamps, stencils and printing on fabric. I have fabric all ready, stamps and stencils all ready to make my own designer fabric. Where to start?
Then the most shocking of all - I want to scrapbook! I have not done any scrapping for several years. Where does this come from?
I will have to pick something and get started. Get creative again.
Tuesday, May 21, 2013

Monday, June 25, 2012
Winter knitting and crochet
 It is freezing in Joburg the last week. OK, freezing for us southern hemisphere inhabitants who are used to sunny days....The weather has inspired me to do some knitting and crocheting in front of a cosy fireplace.
I found these stunning patterns from Knit 1 on Ravelry. They are the Magnum Reversible Vest in knit and crochet and the Magnum Capelet. All made with Magnum yarn from Cascade Yarns, a super chunky 100% wool. Sadly not available in South Africa, so I had to use substitutes.
First I made the crochet Reversible Vest with Sirdar Indie shade # 0156, a lovely mix of brown, creme, green and purple. Using a size 12mm crochet hook it took me a few nights to finish it. This is such a simple pattern, although I did change the pattern quite a bit to make mine fit as I wanted it to.
The first picture on this post shows the finished vest, all in one piece. Next time I would make the armholes closer to the top to make a smaller collar, but I love the length.
My attempt at making the knitted version was not so successful. Actually the vest came out perfect, but as I followed the pattern exactly, it ended up way too small! The designer must be a very small lady. I am trying to work out a way to make it bigger...

Then I decided to make an even more easy vest. This is also in ONE piece . I knitted with size 12mm circular needles that are 80cm long as it was easier and lighter than using regular iknitting needles. The wool is Gedifra I found at Arthur Bales in Linden at a bargain price of R40 a skein, that is about $5 a skein! Sadly, this gorgeous wool is being discontinued. The story of my life...
I knitted the vest without any shaping for the arms and shoulders and looking at it on, I think it might be good to do that next time. Still lovely, cozy and warm....

Lastly, I started on the Magnum Capelet from Knit 1. This is where I am right now. Very difficult to try on as the needles just hold all the stitches. I am using Sirdar Indie in shade #0155, a beautiful mix of natural, blue and green. Cannot wait to use this warm capelet!

I also made 3 crocheted hats. This Winter's absolute must-have color - mustard-yellow -was a given, so I took 2 skeins from my most protected yarn stash ever - the last 8 skeins of the discontinued Elle Wool Boutique Merino Solids in Light Mustard. (I called EVERY wool shop in South Africa to find only 10 skeins!). I even lined the hat with mustard colored knit fabric. I also made a grey and dark pink hat, but will post pics as soon as they are also lined.
I have had enough of uploaded pictures disappearing for one day, thank you. I will post soon again. Hope you enjoy looking at all my projects.
Stenciling mastered...

I look at the pictures I posted in February this year showing my first attempts at stenciling onto fabric and I cringe! Lots of research and practice later, and most importantly, the right tools, and this is my first top I made with this method.
This is a repeat of several paisley patterns I bought from The Stencil Company at the HobbyX craft exhibition in Johannesburg in March this year. The paint is a charcoal grey, not sure if you can see the color clearly.
I added an African pattern to the sleeves. Cute. Really love this top. I have a few others that are in progress, hanging on the walls of my sewing room...

Like this natural color knit top with the cutest African dance scene stencilled on. This stencil is just one of the extensive range available on www.theafricanstencilcompany.com based in Cape Town.

A closer picture of the dance scene...stenciling with a sponge makes all the difference!
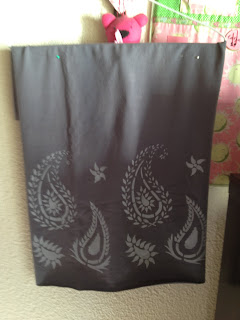
And this is a skirt I am working on. I plan to do lots more of these.
Monday, February 13, 2012
How to: Make your own Stencils
I have been experimenting with fabric painting, using stencils. And I discovered the wonderful world of Lotta Jansdotter http://www.jansdotter.com. I just love her simple, almost child-like, drawings. I have been really disappointed with stencils available locally, so I decided to make my own stencils.

First I had to decide on patterns. I went back to my old Scrapbooking albums when I started playing around with texture in my layouts. All my favorite flower shapes were there. None of them conventional shapes. I drew the shapes freehand on some tracing paper.

Then I traced the shapes onto a plastic sheet with a permanent marker. It takes a minute or two to dry and then does not smudge at all!

Now comes the difficult part. Cutting out the shapes is NOT easy and needs a very steady hand and patience. It took a few tries before I got the hang of it. Use a self-healing cutting mat, tape the plastic sheet to the mat with masking tape and using your X-Acto knife, cut the shapes out. That's it! Your stencil is ready to use.

My first try at making a stencil (based on many online tutorials) was to trace the shape on very thick cardboard and cutting it out with my craft knife. Needless to say this was time-consuming and not the best way!

For my first stencil painting effort I used a stencil brush. This may be good if used on other surfaces, such as walls, but on fabric it did not work so well!

The paint was tick and the edges fuzzy...

I made the paint thinner, but it was still not a good result. I decided to try a foam sponge. All I had in the house was the pot scourers and I cut one in half. What a great result! I have subsequently purchased some paint sponges from the art shop. They are inexpensive and work great!

These are bunny shapes printed on skirt panels. The skirt is a gift for a friend. It is best to first cut out your skirt or top panels, then print your shapes on the fabric and then sew your project. It takes several hours for the paint to dry properly and then you need to iron the paint to set it. You either iron with a piece of cloth over the motif, or you iron the back of the fabric with the motif on, but not directly on the paint.
The plastic sheets are from Showbiz but are still not the thickness I want for my stencils. The plastic stencils work so well. Easy to clean and store, can be re-used a million times and the printed image is clear and precise. I will soon share some of my projects! Have a great week!
Friday, January 27, 2012
Hope Dress
I don't believe I have the tension quite right yet on my new serger, but at least the thread does not snap off anymore. What a beautiful and neat finish it gives clothing. Why have I never used one before? Here is my completed version of the Hope Dress.

It does not look like the Hope Dress at all! This is a shorter version that started out as a top, but now looks more like a cardigan/jacket to me. Here it is without a belt...

And here it is with a belt...I realize that I will have to wear this top with slim-fit pants or skirt to avoid looking big. I also spent some time shortening the hems of a few new pairs of linen pants last night.

Then I made this lovely and simple knit top. I used a top I bought as a template for making my own pattern. It has a seam in the middle of the front and all seams are serged instead of being sewn. It has these cute little cap sleaves. Really nice top, very quick to make and looks stunning.

And then, when I was serging the neckline, my hand slipped and I pulled the fabric and the serger took a huge bite out of the neckline! Can you see it on the pic above? Look at the scew neckline to the left. I was so MAD at myself! It happened with the one sleeve too, but I could fix that easily. The neckline, nor so easy to fix. I tried to cut the right side to match, but it looks funny now. Tonight I will serge it again and make the neckline more round to even it out. I obviously still need to get more driving experience on the serger....
Tuesday, January 24, 2012
Serge ahead!
I am delighted to report that I have solved my serger problems. Last night I ripped out a serger book I bought a while ago and also googled my problem and continued to thread, and re-thread and I fiddled and...finally it worked! I don't care why. So, I finally did some sewing! And this is what I started making...

I LOVE it! I used some of the new knit fabric I bought at Tasha's Habby Shoppe at the Mosselbay Mall on holiday. Tasha has the most amazing fabric shop, so pay her a visit if you are in the area. This fabric is stunning. I used the Hope Wrap Dress pattern you can find FREE here http://www.burdastyle.com/patterns/hope-wrap-dress.
The creator claims the dress pattern is a size 34, which is my size, but it soon became clear that this is a very small size 34! I think she used fabric that has quite a lot of stretch in it. Fortunately I cut mine a bit bigger as I could see the waist was very tiny. It was however still small, so I came up with the idea of making the neck trimming wider.

Not the greatest picture, but you can still see my stunning serging in the neckline. I picked green and pink from the colours on the fabric and made a wider neckline band. I did not even finish off the green fabric, just sewed it on the pink closer to the edge. I am really pleased with the result so far.

I still need to sew on the sleeves, finish the hem and the sash. Very nice indeed!

Here is a pic of some of the fabric I bought from Tasha's Habby Shoppe. The black fabric with the white daisies is my next project! I hope to finish my top tonight and will share pics soon!
Monday, January 23, 2012
Sew frustrating...
In November last year I purchased a new Janome overlocker. I forget the model now... Last night was the first time I actually had some time to use it.

Why did I buy a new overlocker when I have one? Well, I am unable to find a manual for the dinosaur I currently own and I am too embarrased to visit the lovely lady at the Singer shop (for the 5th time) to help me re-thread the damn thing! So when the Janome's were on special, I bought one. The new model would be so easy to thread since it has all these color-coded guides and a MANUAL, not so? WRONG.
I spent over 2 hours last night threading and re-threading and finally gave up. Firstly, I discovered that maybe I need new glasses. Or maybe the modern machines are made with smaller components? I also discovered that only Mrs Incredible with her elastic body would be able to get into some of these threading points. I am no Mrs Incredible of course. I lost count on how many times I re-threaded, but the manual says it is either threaded incorrectly (duh) or the tension is wrong (duh again). Well, with 4 tension dials, I am at a loss. I changed tension a million times and each time another thread breaks. I will try again later today when my patience returns....

On a more creative note, I sat on Friday night and finished this cute crochet bag for a new sewing friend! This is the Sack Bag pattern on Crochet Me, originaly crocheted from a Sack dress torn up and used as "yarn". I double the pattern to make a bit bigger bag though. Just need to do lining.

I am so pleased with my revamped sewing room! When we came back from our lovely seaside holiday, I decided to do some spring cleaning around the house. My sewing room took several days! My DH helped me to sort out a storing system for my fabrics, see pic above. He cut me these large "cards" that I roll the fabric around and store it in these neat plastic holders. I am petrified of moths eating my lovely fabrics! Nor more fear with plastic containers as well as lots of cedar wood blocks all over and doom at the ready.

Can you see some of my awesome new fabrics in the middle shelve? These are some of the fabrics I found at a small shop in Mosselbay, while we were on holiday. I will share more detailed pics of these fabrics soon. I also hope to get my overlocker to work soon....
Thursday, January 5, 2012
To a crafty 2012!
I hope you all had a peaceful Christmas and wish you a crafty 2012! My first goal for 2012 is to make more time for my crafts this year. That includes blogging about it!
A New Year means new things so my plan is to revamp things around here a bit and then to blog more regularly - even if I don't make anything...I certainly am adding to the stash regularly, so I will have something to share!
We spent a few days in the southern Drakensberg area in KwaZulu Natal, near a pretty town called Nottingham Road. The weather did not support much else than trout or bass fishing though. We were home to spent Xmas with the family and then left again on Boxing Day for Mosselbay. We spent a glorious 10 days there with friends. My DH and youngest son did some scary stuff like bungy jumping off the Bloukrans Bridge (that is a 216m drop!) and scuba diving (in a cage of some sort) with great white sharks! I decided to join the shark diving expedition at the last moment, but it was fully booked. Bummer.
I spent lots of time doing girly things like getting my hair done, having tea with the girls at a charming tea garden, and lots of shopping of course. Then one day, my friend dropped me off at this crappy shopping mall and I made the biggest fabric find EVER at a small little shop inside! I will share some pictures in my next post, if I survive the spring cleaning faze at my house!
I cannot wait to share what I found in Mosselbay. Let me go find my camera...
A New Year means new things so my plan is to revamp things around here a bit and then to blog more regularly - even if I don't make anything...I certainly am adding to the stash regularly, so I will have something to share!
We spent a few days in the southern Drakensberg area in KwaZulu Natal, near a pretty town called Nottingham Road. The weather did not support much else than trout or bass fishing though. We were home to spent Xmas with the family and then left again on Boxing Day for Mosselbay. We spent a glorious 10 days there with friends. My DH and youngest son did some scary stuff like bungy jumping off the Bloukrans Bridge (that is a 216m drop!) and scuba diving (in a cage of some sort) with great white sharks! I decided to join the shark diving expedition at the last moment, but it was fully booked. Bummer.
I spent lots of time doing girly things like getting my hair done, having tea with the girls at a charming tea garden, and lots of shopping of course. Then one day, my friend dropped me off at this crappy shopping mall and I made the biggest fabric find EVER at a small little shop inside! I will share some pictures in my next post, if I survive the spring cleaning faze at my house!
I cannot wait to share what I found in Mosselbay. Let me go find my camera...
Monday, September 26, 2011
Stretch Knit Jacket

Today I want to share my STRETCH KNIT JACKET with you. After several days of searching on the Internet to find a pattern, I finally looked through all my Burdastyle magazines. I found several that I really liked, but then decided to make a pattern from a store-bought jacket I already own and adore. In fact, I own two of these jackets.

This is my favorite. It has a huge blue owl stitched onto the back. The stitching is done in a unique way, making the seams look unfinished and using contrasting colour thread.

This is the second jacket, in a dark creme colour with black flower pattern. This one has a large flower stitched on the back. Both jackets are from a local designer OLKAPOLKA and can be bought at Big Blue or YDE.
I layed the jacket on my sewing table and copied the panel pieces to make my own pattern. Using stretch knit fabric I just ordered from Hobby Lobby in the US, this is my first attempt:

I added white stretch knit fabric for lining. I just love the white contrast detail on the sleeves! The button holes were a REAL challenge! Even after adding some iron-on support, it was still a challenge. I did most of the buttonholes by hand in the end.
I love the almost "unfinished" look of the sewing detail. The original jacket is sewn by putting the lining and outer jacket parts wrong sides together, leaving the seams looking unfinished. Very cool effect! I am planning several more of this jacket with a few small changes such as more firm support in the front panels and collar.
Tuesday, August 23, 2011
The last month I...
I am really embarrassed that another month went past and I did not blog. So, I will give a quick update on what I did the last month. I was in London for a quick visit the last week of July. Sadly, there was no time for any shopping, but I am going back in November and will make sure I shop then!
Oh, and Arthur Bales had a SALE the week I was away in London. Bah!

This is what I bought when I got back. Some lovely lilac and pink fine corduroy for bags and a small piece of Valori Wells' "Nest - Ol' Paisley" corduroy fabric. I have this earmarked for a jacket, but need to go get some more fabric first. I also bought some gorgeous Indie yarn by Sirdar.

After I bought this Sirdar Indie pattern book at Arthur Bales, I had to get some of this gorgeous yarn too! Look at some of the awesome patterns in this booklet below.

This cardigan is knitted in Indie # 157 Crazy Horse. Although I am not planning to knot this cardigan, I am planning to make something else in the booklet with this stunning yarn.

This beautiful shade is called Indie # 155 Prairie. The combination of brown, green and blue is simply stunning!
I have been rather lazy in my sewing room...lots of inspiration, but no real will to do anything. In my next post I will share some of the inspiration I am talking about....
Thursday, July 21, 2011
Gorgeous Crochet Shrugs!
This post is a few days later than promised, but worth waiting for I can promise you! I was browsing on Ravelry a few weeks ago and happened upon the 9 -to-5 Shrug pattern. Wow! I love quick, simple, easy projects and this one fits the bill. Imagine making a little jersey in just a few hours, all in one piece - no seperate pattern pieces...

This is my first attempt at this cute and easy little Shrug, although it is based on another tutorial, whilst I was waiting for the 9-to-5 Shrug pattern to be published in Crochet World magazine.

And this is my first 9-to-5 Shrug. Gorgeous isn't it? I have no less than another 6 planned, of which 3 are already in progress. Yes, all at the same time. I get bored easily, so each day I can pick which one I want to continue with. I know, progress is slow, but I will get there!
This pattern is in the August 2011 issue of Crochet World magazine, which can be purchased in an e-book format from their website.
Right now, I am looking for the perfect tutorial to sew a Drape Cardigan. I think I have finally found it today. Will share soon!
This is my first attempt at this cute and easy little Shrug, although it is based on another tutorial, whilst I was waiting for the 9-to-5 Shrug pattern to be published in Crochet World magazine.
And this is my first 9-to-5 Shrug. Gorgeous isn't it? I have no less than another 6 planned, of which 3 are already in progress. Yes, all at the same time. I get bored easily, so each day I can pick which one I want to continue with. I know, progress is slow, but I will get there!
This pattern is in the August 2011 issue of Crochet World magazine, which can be purchased in an e-book format from their website.
Right now, I am looking for the perfect tutorial to sew a Drape Cardigan. I think I have finally found it today. Will share soon!
Friday, July 15, 2011
Crafty Alert!
After a tough couple of months, I am finally back in Blogland! I missed blogging, visiting other blogs, and you, all my crafty blog friends. I will share my latest creations as soon as I can take pictures and upload! Come visit soon and please send me a link to your blog so I can visit with you. Have a crafty weekend!
Monday, May 2, 2011
Off-the-shoulder tops
I am still here. Still sewing, creating, just not blogging. A new bug bit me. Actually a few. I was sick for 5 weeks can you believe! Flu and then a very nasty stomach virus. I am finally better now. The other bug is Facebook. After many years I finally joined the social networking craze and found a whole lot of old schoolfriends. Really awesome!
Anyway, I missed my blog. And my sewing friends! So I took some pics and decided not to bore you with the almost 20 (!) peasant style tops I made since my last blogpost. I will instead share the other sewing craze I have been busy with. It was literally a crazy quest. I saw a picture of an awesome top on a romance novel cover. And I wanted to make one. Here is the cover pic.
 Isn't this a gorgeous top? I searched the Internet for a pattern. No luck. I did find one very good tutorial here http://girlispoison.blogspot.com/.../tutorial-off-shoulder-crop-top-w-sewing.html. This lady had a really awesome picture tutorial and a free pattern! Go check it out.
Sadly, this pattern did not work for me. I had some issues with my underarms bunching up, no matter which parts I sewed first. If any of you do try this lady's pattern and get it right, please drop me a line and tell me where I went wrong. So I started looking at my own patterns and started modifying them. This is my first attempt...

What I did was to take standard bodice and sleeve pattern pieces from other patterns I have.

All I did then was to fold down the top parts of the two pattern pieces, as shown in the picture above. I also shortened the sleeve length. The armholes must fit perfectly.

I forgot to mention that I used a back bodice pattern piece. Here are the cut out pieces, ready to sew. I added a band for the top that will fit your shoulders. I sewed the sides of the bodice pieces together and also the sleeves. Then I fitted the sleeve pieces inside the bodice piece, right sides together, and sewed that together.

This is what it looks like all sewn together. All that needs to be done now is sewing the neckband on - not a strong point of mine - and the hems. Pretty simple, hey?

Here it is on! Getting closer to my quest for the perfect off-the-shoulder top. Close enough that I tried another one...
 This one a bit longer to wear with skinny jeans or leggings. Pretty nice. But I was still not happy. I then had a brainwave. I often see sewists use store-bought tops they like as a basis for a pattern to make more of a top that fits well. So I went hunting in my closet...
  And found this top. Love it! Fits very well and almost exactly what I am looking for. It will need some modifications, but it's close.

So here is the pattern I drafted from the top. The sleeve was drawn using the same principle as used in the peasant top tutorial I mentioned a while back. You draft the sleeve using the armhole part of the bodice as a basis so you have a perfect fit. Can you see the similarities between the sleeve pattern piece and the bodice piece? The armhole and neck part is exactly the same.

And here is the grand finale! The top I wanted from the start. In my favorite fabric too. I still need to work on making the neckband on my next top a bit tighter, but I am very pleased with the result. Hope it inspires you to make your own off-the-shoulder top too!
I have a few more cut out and ready for sewing on my cutting table. Thank you for all the lovely comments about my peasant tops post in February! Here is the link for the peasant top I used as a basis for my pattern: http://www.thingsofcloth.com/.../Adult-size_Peasant_Blouse_Tutorial.pdf This pattern's bodice is not shaped. I modified mine a lot, so play around until you get the result you want. Happy sewing!
Subscribe to:
Posts (Atom)


