In November last year I purchased a new Janome overlocker. I forget the model now... Last night was the first time I actually had some time to use it.

Why did I buy a new overlocker when I have one? Well, I am unable to find a manual for the dinosaur I currently own and I am too embarrased to visit the lovely lady at the Singer shop (for the 5th time) to help me re-thread the damn thing! So when the Janome's were on special, I bought one. The new model would be so easy to thread since it has all these color-coded guides and a MANUAL, not so? WRONG.
I spent over 2 hours last night threading and re-threading and finally gave up. Firstly, I discovered that maybe I need new glasses. Or maybe the modern machines are made with smaller components? I also discovered that only Mrs Incredible with her elastic body would be able to get into some of these threading points. I am no Mrs Incredible of course. I lost count on how many times I re-threaded, but the manual says it is either threaded incorrectly (duh) or the tension is wrong (duh again). Well, with 4 tension dials, I am at a loss. I changed tension a million times and each time another thread breaks. I will try again later today when my patience returns....

On a more creative note, I sat on Friday night and finished this cute crochet bag for a new sewing friend! This is the Sack Bag pattern on Crochet Me, originaly crocheted from a Sack dress torn up and used as "yarn". I double the pattern to make a bit bigger bag though. Just need to do lining.

I am so pleased with my revamped sewing room! When we came back from our lovely seaside holiday, I decided to do some spring cleaning around the house. My sewing room took several days! My DH helped me to sort out a storing system for my fabrics, see pic above. He cut me these large "cards" that I roll the fabric around and store it in these neat plastic holders. I am petrified of moths eating my lovely fabrics! Nor more fear with plastic containers as well as lots of cedar wood blocks all over and doom at the ready.

Can you see some of my awesome new fabrics in the middle shelve? These are some of the fabrics I found at a small shop in Mosselbay, while we were on holiday. I will share more detailed pics of these fabrics soon. I also hope to get my overlocker to work soon....
 Ta-da! A brand-new, handmade cutting table! My FIL is a whiz with making stuff and I asked him to make me a table to specifications for my new sewing room. He added a second shelf below where my overlocker and some other essentials are neatly stored. I had to go buy another large self-healing cutting mat and my long steel ruler is finally being put to good use on top of this table.
 Just love it and it works wonderfully for me. No more sitting on the carpet to cut out fabric.
 The latest issue (#47 Summer 2010) of the quarterly Bernina Inspiration magazine was just the inspiration I needed to christen my new cutting table.
  This purple top is made from jersey stretch fabric and is super-easy to make. Just 2 pattern pieces and some elastic makes for a fast sew. I did not however like the off-the-shoulder look that much, so I played around and modified the pattern a bit.
 This is the end-result. Two pattern pieces, front and back, all-in-one. I modified the neck and sleeves and it fits perfectly now. Here are a few tops I have now made with this pattern.
 The second is just a standard stretch jersey fabric with lots of stretch in orange and brown. I am wearing this top today for the first time and love it. Also shirred around the neck with elastic thread.

 I also bought two new books. Love Lisa's book! So many awesome bags to sew. Sew Liberated has a peasant top pattern in that I am also keen to try.
 I have been sewing a bit lately, although not much. I made this very simple black and white top with some white stitching on the black fabric at the waist. I used my favorite top pattern from the Bernina Inspiration magazine and just modified it a bit. I am not a frilly clothing kind of person and although I love the ruffled neck, I should have made the ruffle smaller. When I wear this top, it feels as if the ruffled neck is HUGE!
 Another one of my favorite patterns. I just love this bright fabric! This is the third top I have made with this fabric. I noticed though that the colors tend to run when it gets wet. This is handwash only fabric.
 We have been trying for a long time to get a nice picture of all three our dogs together. Not an easy task! As you can see, my son had to hold the two smaller dogs for this picture! Both Maxine and Buksie have recovered well from their recent operations and Jessie is growing every day. Just look at those sweet faces!
 Apart from the built-in closet, the carpenter also added a deep shelve all around the room where all my plastic containers with yarn can be stored. This was my DH's idea and what a great idea it was! I have sorted all my yarn by type and labelled the containers. I even have a container each for WIP crochet projects as well as WIP knitting projects!
 This is my new Scrapbooking Corner. Although I have not done any Scrapbooking for over 2 years, lately I have felt like it, so I have hauled out some of my supplies. The closet will be divided into craft areas as well.
 This is my sewing and computer corner. I must still sort out the wires. As you can see my sewing table sports a brand-new cover.
 Another picture of my high shelving for yarn storage. I bought these really nice cherise pink fabric storage holders and labelled each one after I sorted the yarn by type.
 This is my sewing (handbags and other) supplies corner of the closet. All my cotton fabric, handbag, apron and other patterns and tools for sewing is in this part.
 This is the crochet/knit as well as part of my sewing (clothing only) supplies corner in the closet. Here you see (most of) my stretch knit fabric and clothing patterns as well as all my knitting needles and crochet hooks, etc.
 This picture was taken from the door. It shows the large open space in the middle of the room, in front of the window. This is where my new cutting table will be! My FIL is a mean woodworker and he is busy making me a wooden cutting table to my exact specifications. It will be a plain wooden table the exact size and height to make cutting fabric easier on me. I cannot wait!
 This is my first attempt. Lovely new flowery knit fabric I recently found at a local fabric store. I selected the size S (4-6) size and cut out the pattern on the second cutting line on each pattern piece. Each pattern piece has three sizes. The only reason I did this is because the first cutting line made the top front piece look extremely small. Although I do like the top, the front bodice was too big for me. The elastic part is not quite right.
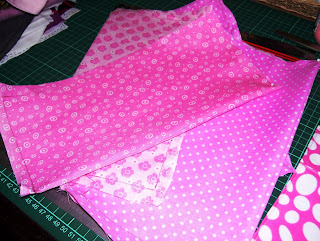
 This is my second attempt. My favorites - pink and polka dots. Another knit jersey fabric I bought at Hobby Lobby in Chicago. This time I cut the pattern on the first line and the bodice fit perfectly. Sorry, no pics of me wearing it, although I have warn it twice already! I also changed the bottom part to flare a bit and made it a bit shorter than the first version.
  You might remember I mentioned that I am re-doing my sewing room? It has been a very busy time with me spending several days clearing out my sewing room (I cannot believe how much stash I have accumulated!!) and getting it ready for the make-over. This is a picture I took this morning. The room has now been freshly painted and internet and power cables neatly laid. I just need to clean the carpet and wait for the carpenter to come in the end of this week. He will be installing shelves and a closet. The exciting part is coming soon!
 I could not resist taking this picture! This is a first, Jessie sleeping on my cane chair in my sewing room. She was very affectionate last night, just wanting to cuddle up to me, so I put her on my chair for a snooze. Adorable. She looks like a rabbit at the moment when she runs - she is all long legs and ears!
 This lovely surprize arrived in my post box yesterday! Thank you so much Karol-Ann! My lovely blog friend from the UK sent me a whole bunch of knitted and crocheted bag patterns from her old magazines. This top picture is my favorite. It uses the Rowan Biggy Print yarn and as you know, I am into the super-chunky yarn phase now.


 Most crafters used zip-lock type of plastic bags to store their circular knitting needles and just added stickers with the needle size and length on top. This is very neat and a great storage idea. However, I wanted to SEW my storage bags, not buy them. So I planned, plotted and measured and cut out fabric. Basically, it is just a long, doubled rectangle of fabric sewn up, and folded over for the pocket. I ironed on a very thin, lightweight fusible interfacing on one side only to give it some strength but not make it bulky.
 I used my old faithful Crop-A-Dile from my scrapbooking days to make the holes and set the eyelets. My favorite and most useful tool!
 Here's a close-up of my finished pockets with the eyelets all set.

 The tutorial makes a very neat zipper! I used pink fleece for the back (so huggably soft, hmmm!) and lovely flowery cotton from Hobby Lobby for the front. This tutorial makes the cover fit a standard cushion snugly, which is great.
 Of course I bought it! So here is my "new" baby! An Empisal Mercury 404. I have never worked on a serger before so this is a learning curve for me. I received a 30 minute lesson on how to operate it from the expert at the Singer shop. I am amazed at what this baby can do! And how long it takes just to thread it! I had to go and stock up on thread of course. This baby eats thread!


